March 2017
Digitre - handwritten digit recognizer
Or how to make a simple application using Flask and TensorFlow
Recently I have been exploring Python web frameworks. I got really interested in Flask and thought the best way to take a deeper look at it would be to build a simple web app. Since I am also really interested in machine learning, the idea came naturally to make it a machine learning app. That's the story behind Digitre, a handwritten digit recognizer.
Handwritten digit recognition is an introductory problem in the field of computer vision. It has been studied extensively and has effectively become the "Hello world" of machine learning. It is thus a great choice for a simple web app, allowing me to build a machine learning application while focusing mainly on the web framework code. Read on to learn all about it.
Building the front end
To save time and work with the front end design, I used a freely available template. Digitre's front end is based on "Intensify", one of the free responsive CSS and html website templates by Templated. I tweaked the page design a little bit to make Digitre's landing page.
As its main functionality, Digitre needs a way to allow the user to draw digits
freely. The drawings then need to be collected and passed on to the digit recognizer.
Digitre uses JavaScript to allow the user to draw graphics on the fly in an HTML
The next step is to share the digit with the server, where Flask will handle the rest.
I am using AJAX with JQuery, which allows me to update the page to display the result of the digit
recognition without having to reload the whole web page. To write the code I used the
example
in Flask's documentation as a starting point and changed it to transfer the data in JSON format
in the body of a
$(function() {
	$('a#push_data').bind('click', function() {
		$.ajax({
			url : $SCRIPT_ROOT + '/_get_digit',
			type: "POST",
			data: JSON.stringify([
			{digit: $('textarea[id="data-paint"]').val()}
			]),
			contentType: "application/json; charset=utf-8",
			dataType: "json",
			success: function(data){
				$("#result").text(data.result);
				$("#probability").text(data.probability);
			}
		});
		return false;
	});
});
Flask code
I needed Flask to perform three tasks besides rendering the website: collect the base64-encoded handwritten digit images; hand the images over to the machine learning recognizer; and return the result back to the front end. The complete Flask code is shown here below.
from flask import Flask, render_template, request, jsonify
import digitre_classifier
import numpy as np

app = Flask(__name__)

# Instantiate Classifier
model = digitre_classifier.Classifier(file_name='cnn.tflearn')

@app.route('/_get_digit', methods=['POST'])
def get_digit():
    """Get digit drawn by user as base64 image and recognize it"""
    digit = request.data
    digit = model.preprocess(digit)
    prediction = model.classify(digit)[0]
    # Get class with highest probability
    max_idx = np.argmax(prediction)
    max_val = prediction[max_idx]
    prob = np.around(max_val, 3) * 100
    # Output strings
    if prob < 60:
        prediction = 'Huh...'
        probability = 'You call that a digit?'
    else:
        prediction = str(max_idx)
        probability = '({}% probability)'.format(str(prob))

    return jsonify(result=prediction, probability=probability)

@app.route('/')
def index():
    """Render landing page"""
    return render_template('index.html')

if __name__ == '__main__':
    app.run(debug=True)
To unpack its components, the script starts off with the imports, including the
required Flask functionality, the digit recognizer or classifier (more detail about
that in the dedicated section below), and the scientific computing package NumPy. Next
it instantiates the
Two functions implementing the Flask tasks follow. The functions use Flasks's
The machine learning digit recognizer
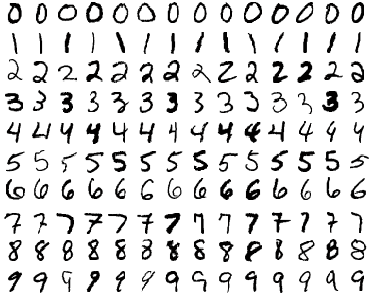
As I mentioned above, handwritten digit recognition is a widely studied problem in the field of computer vision. A popular training dataset, the MNIST, has been around for quite some time and has been used extensively to benchmark developments in the field. It is a subset of a larger dataset distributed by the National Institute of Standards and Technology (NIST). MNIST consists of scanned grayscale digital images of handwritten digits, including balanced sets of 60,000 and 10,000 training and test images, respectively. The images have been size-normalized and centered, making up a nice and clean dataset ready for use. Here are some examples.
I decided to use TensorFlow, Google's machine learning software library to implement the machine learning model. To make the implementation even simpler, I went one step higher in the abstraction level and used TFlearn, a software library providing "a higher-level API to TensorFlow". As for the choice of machine learning algorithm, the best classification accuracies are achieved with deep convolutional neural networks (CNNs), as you can see in the list of research results on MNIST's webpage or in this other curated list. However, you can get very decent accuracies with relatively shallow CNNs too. So, at least for the first implementation, I decided to use a relatively simple CNN architecture with three hidden layers (two convolutional and one fully connected) and relatively small numbers of neurons. Here is the TFlearn code.
def build():
    """
    Build classification model.
    Returns
    -------
    Defined machine learning model
    """
    ### Build CNN model
    cnn = input_data(shape=[None, 28, 28, 1], name='input')
    # 1st convolutional layer:
    # Convolution computing 32 features for each 5x5 patch
    # Stride of one and zero-padded convolutions (defaults)
    cnn = conv_2d(cnn, 32, 5, activation='relu', regularizer="L2")
    # Max pooling over 2x2 blocks
    cnn = max_pool_2d(cnn, 2)
    cnn = local_response_normalization(cnn)
    # 2nd convolutional layer:
    # Convolution computing 64 features for each 5x5 patch
    cnn = conv_2d(cnn, 64, 5, activation='relu', regularizer="L2")
    cnn = max_pool_2d(cnn, 2)
    cnn = local_response_normalization(cnn)
    # Fully connected layer
    cnn = fully_connected(cnn, 1024, activation='relu')
    cnn = dropout(cnn, 0.5)
    # Output layer
    cnn = fully_connected(cnn, 10, activation='softmax')
    cnn = regression(cnn, optimizer='adam', learning_rate=0.01,
                     loss='categorical_crossentropy', name='target')

    # Define model
    model = DNN(cnn, tensorboard_verbose=0)

    return model
The function above builds the TFlearn model. The next step is to train the model on the MNIST data. This only has to be done once. The trained model can then be saved and later restored for use without the need to be retrained. The code below shows three functions I wrote to load the training data, train (i.e. fit) the CNN model, and save the trained model to disk. For convenience, I am using the MNIST dataset version that is distributed with TFlearn.
def load_data():
    """
    Get MNIST training data distributed with TFLearn.

    Returns
    -------
    Tuple containing four objects:
        X: Training data
        Y: Training labels
        testX: Test data
        testY: Test labels

    """
    X, Y, testX, testY = mnist.load_data(one_hot=True)
    X = X.reshape([-1, 28, 28, 1])
    testX = testX.reshape([-1, 28, 28, 1])

    return X, Y, testX, testY


def fit(model, X, Y, testX, testY, n_epoch=20, run_=cn_mnist'):
    """
    Fit (train) classification model.

    Parameters
    ----------
    model: TFLearn model
        Built and defined model.
    X: numpy ndarray, shape=(55000, 28, 28, 1)
        Training data
    Y: numpy ndarray, shape=(55000, 10)
        Training labels
    testX: numpy ndarray, shape=(10000, 28, 28, 1)
        Test data
    testY: numpy ndarray, shape=(10000, 10)
        Test labels
    n_epoch: int, default=20
        Number of training epochs
    run_id: str, default='cnn_mnist'
        ID to assign the current run
    """
    model.fit({'input': X}, {'target': Y}, n_epoch=n_epoch,
              validation_set=({'input': testX}, {'target': testY}),
              snapshot_step=100, show_metric=True, run_id=run_id)


def save(model, file_name='cnn.tflearn'):
    """
    Save trained classification model in current woring directory.

    Parameters
    ----------
    model: TFLearn model
        Trained model
    file_name: string, default='cnn.tflearn'
        Name to assign model file written to disk
    """
    cwd = os.path.dirname(__file__)
    model.save(os.path.join(cwd, file_name))
After training the CNN for 20 epochs it showed 98.92% evaluation accuracy. This is not exactly top performance
in the context of state-of-the-art research results. The current best is
99.79%.
It allows for good performance for this simple app, though, and at the very least it's a good first implementation. From here all
I need to do is call the
The data received from Digitre's front end is not ready to be fed to the machine learning classifier, however. On one hand, the classifier would not be able to process a base64-encoded image. Additionally, the images drawn by the users will look different from the MNIST images. Unless we make them more similar, the classifier will show very poor performance. The next section discusses Digitre's image preprocessing code, aimed at handling these two problems.
Preprocessing the handwritten digit images
The data sent to the server from the front end needs to be peprocessed before classification.
The first step is to convert the base64-encoded image of the digit drawn by the user to a
NumPy ndarray data structure. This is done using function

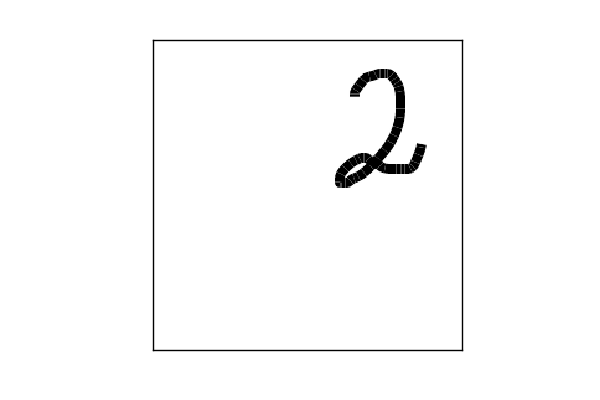
In this particular instance, the user drew the digit "2" at the top right corner of the canvas. Digits in the
MNIST data are size-normalized and centered on their center of mass, so it will help to do that before feeding the
image to the classifier. I wrote functions
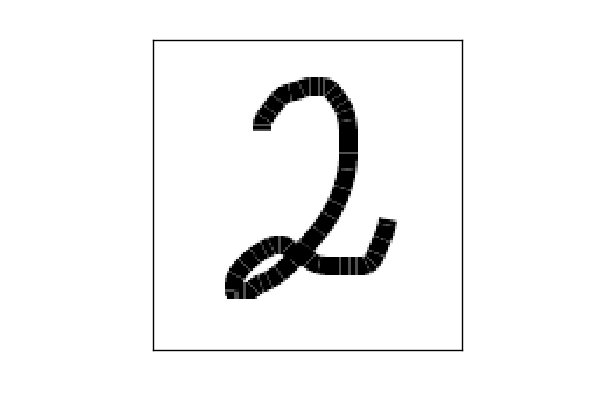
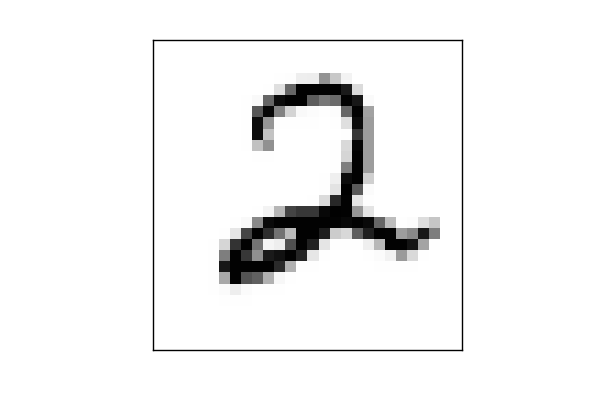
Here's a sequence of pictures illustrating the whole process. The picture on the left shows the original image. In this example size normalization is particularly important, to have the digit fill the frame like in the training data. The picture on the center shows the result of cropping and centering the digit. The image is next resized to 28 x 28 px, resulting in the picture shown on the right side. The final step, rescaling it to the range of values between 0 and 1 has no effect on the appearance of the image.

The final result is quite similar to the training data in MNIST, as you can see here below. The processed image on the left closely resembles an example from MNIST (on the right).
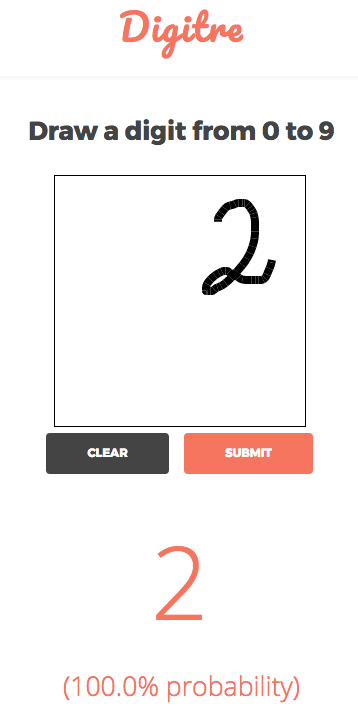
And, finally, here's what Digitre's output would have looked like.
If you are interested in the details, the complete functionality can be found in the
Deployment
I started by checking out several Infrastructure-as-a-service (IaaS) providers to deploy Digitre. Among others, I took a look at the pricing and specs offered by PythonAnywhere, Heroku, OpenShift, AWS Elastic Beanstalk, and Google App Engine. You can find a nice list including these and more providers, with links to their Flask-specific instructions, in Flask's documentation page on deployment options.
I was looking for more flexibility (and lower cost...), however, so I decided to go with a Virtual private server (VPS) provider instead. There are many VPS provider options out there, but eventually I went with linode, which offered a nice platform and very attractive pricing. The self-hosting choice provides a lot of flexibility, but it also means you have to do all the work yourself. Personally, not being an expert in this domain I would not have gone this way if I had any particular security concerns, for example. But to host a simple toy app this is a great solution. For complete control, you could go for the bare metal server possibility and get your own hardware.
In the end, I went with linode's cheapest Standard plan, installed Ubuntu 16.04 LTS as my operating system, used the common engine-X (nginx) web server and the green unicorn (gunicorn) WSGI HTTP server to run the app. This is a pretty common and robust setup and my experience so far has been just great.
Future directions
Digitre's first implementation works relatively well and I am quite happy with it. However, there's much more that could be done to improve it. One obvious change would be to work on the machine learning model. I would stick with a CNN, but as recent research has shown, one can get accuracies as high as 99.79% with state-of-the-art models. Additionally, more sophisticated handling of the fact that the output is always a digit class could also improve performance. One example would be to examine all output probabilities, rather than only looking at the top class. This would be particularly helpful with situations in which the top class probability is not very high.
One other interesting change would be to collect the images drawn by users in a database, along with the user selected class, and then train the model on those images as well. This would allow the collection of relevant data, with the potential to significantly improve performance.
This is it. If you've made it this far, you saw how you can build and deploy your web app using easily accessible, stable, and reliable software. I hope you found this discussion interesting and helpful!